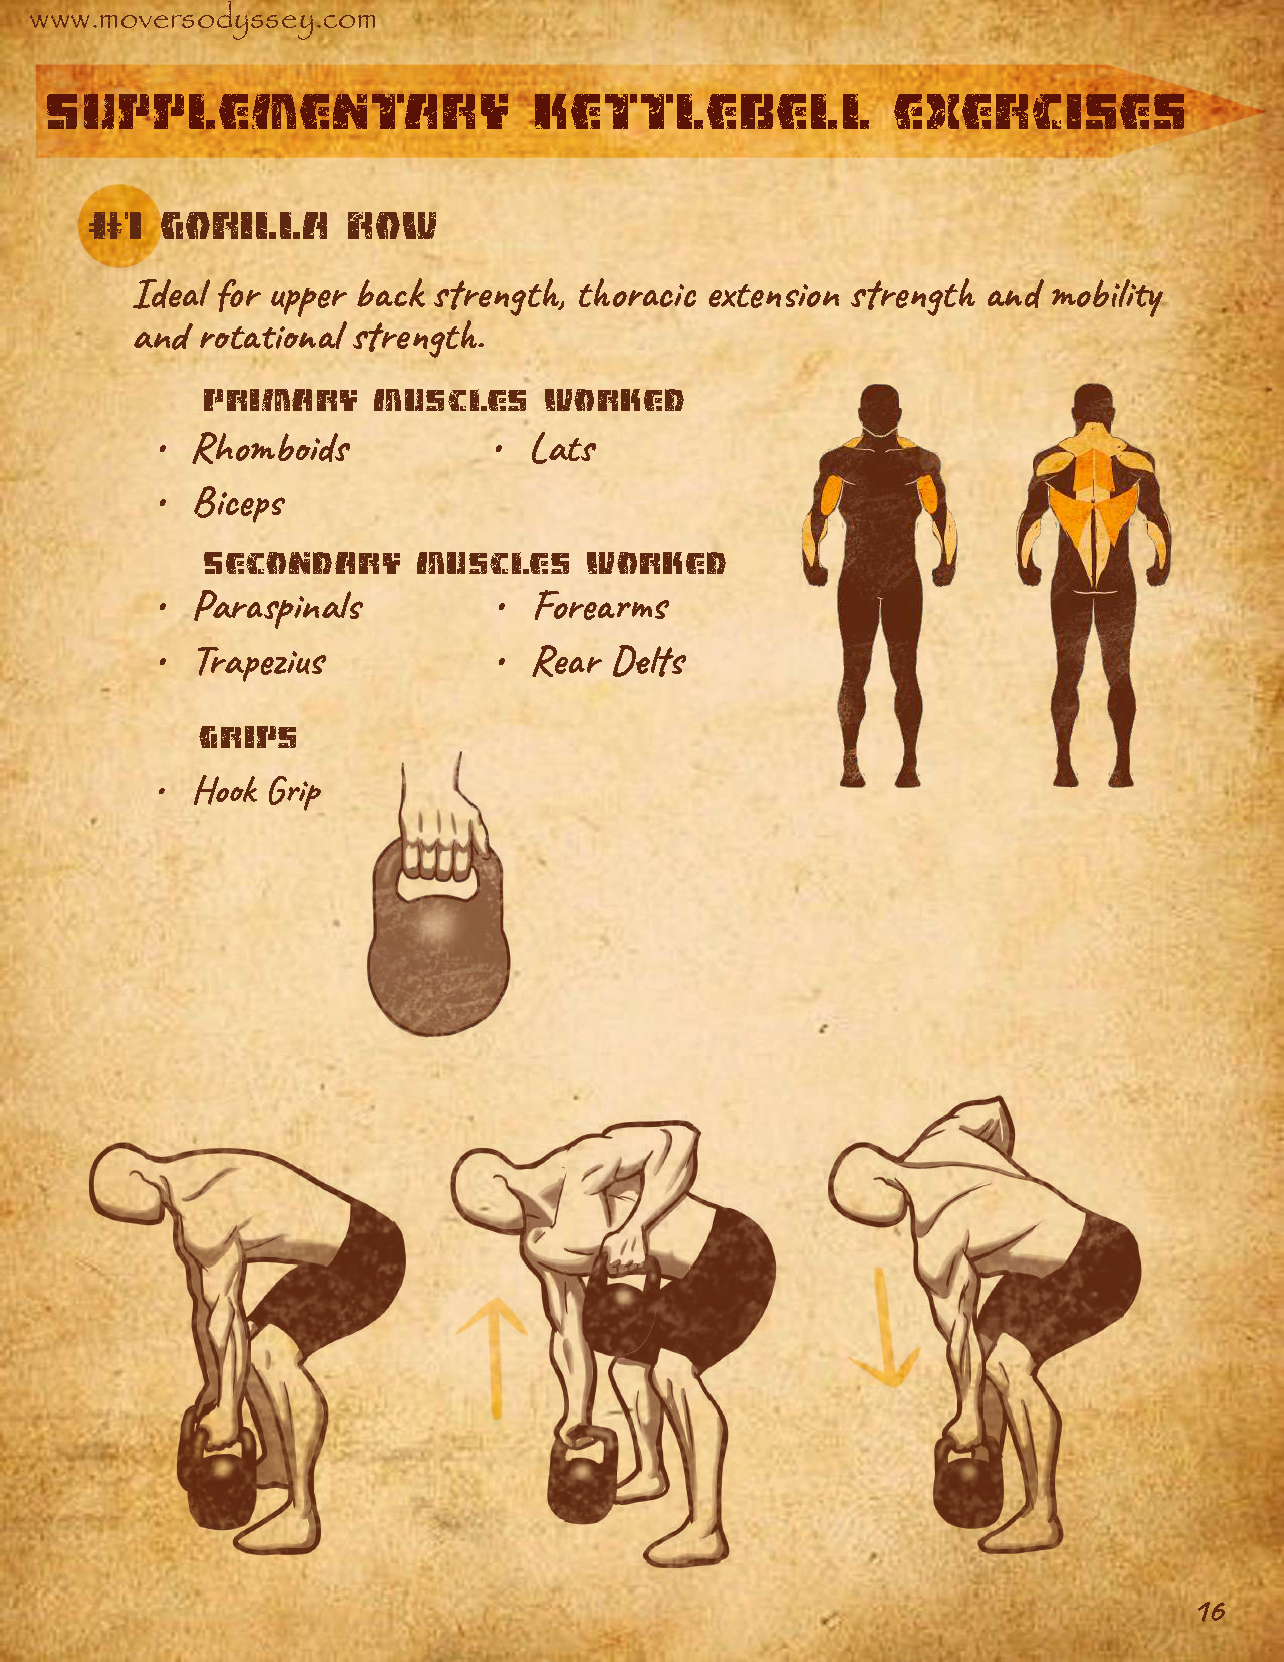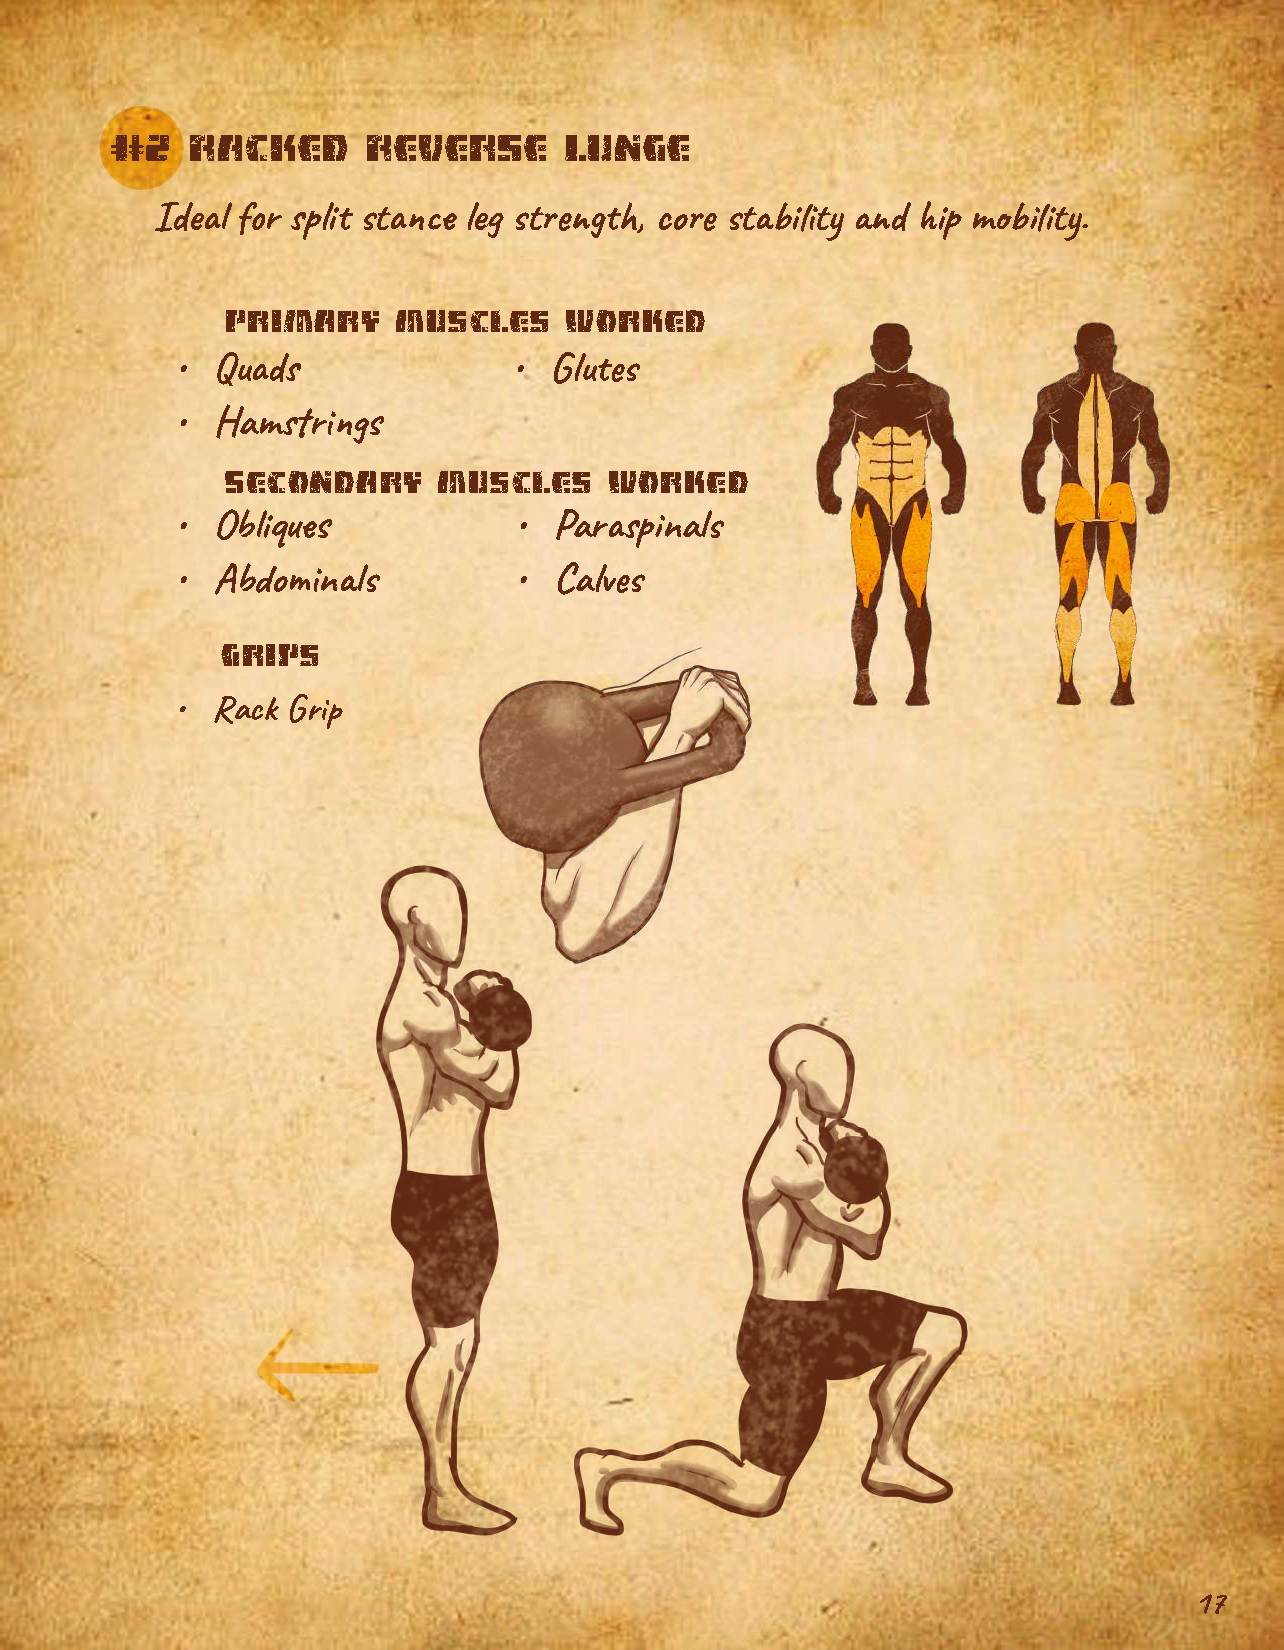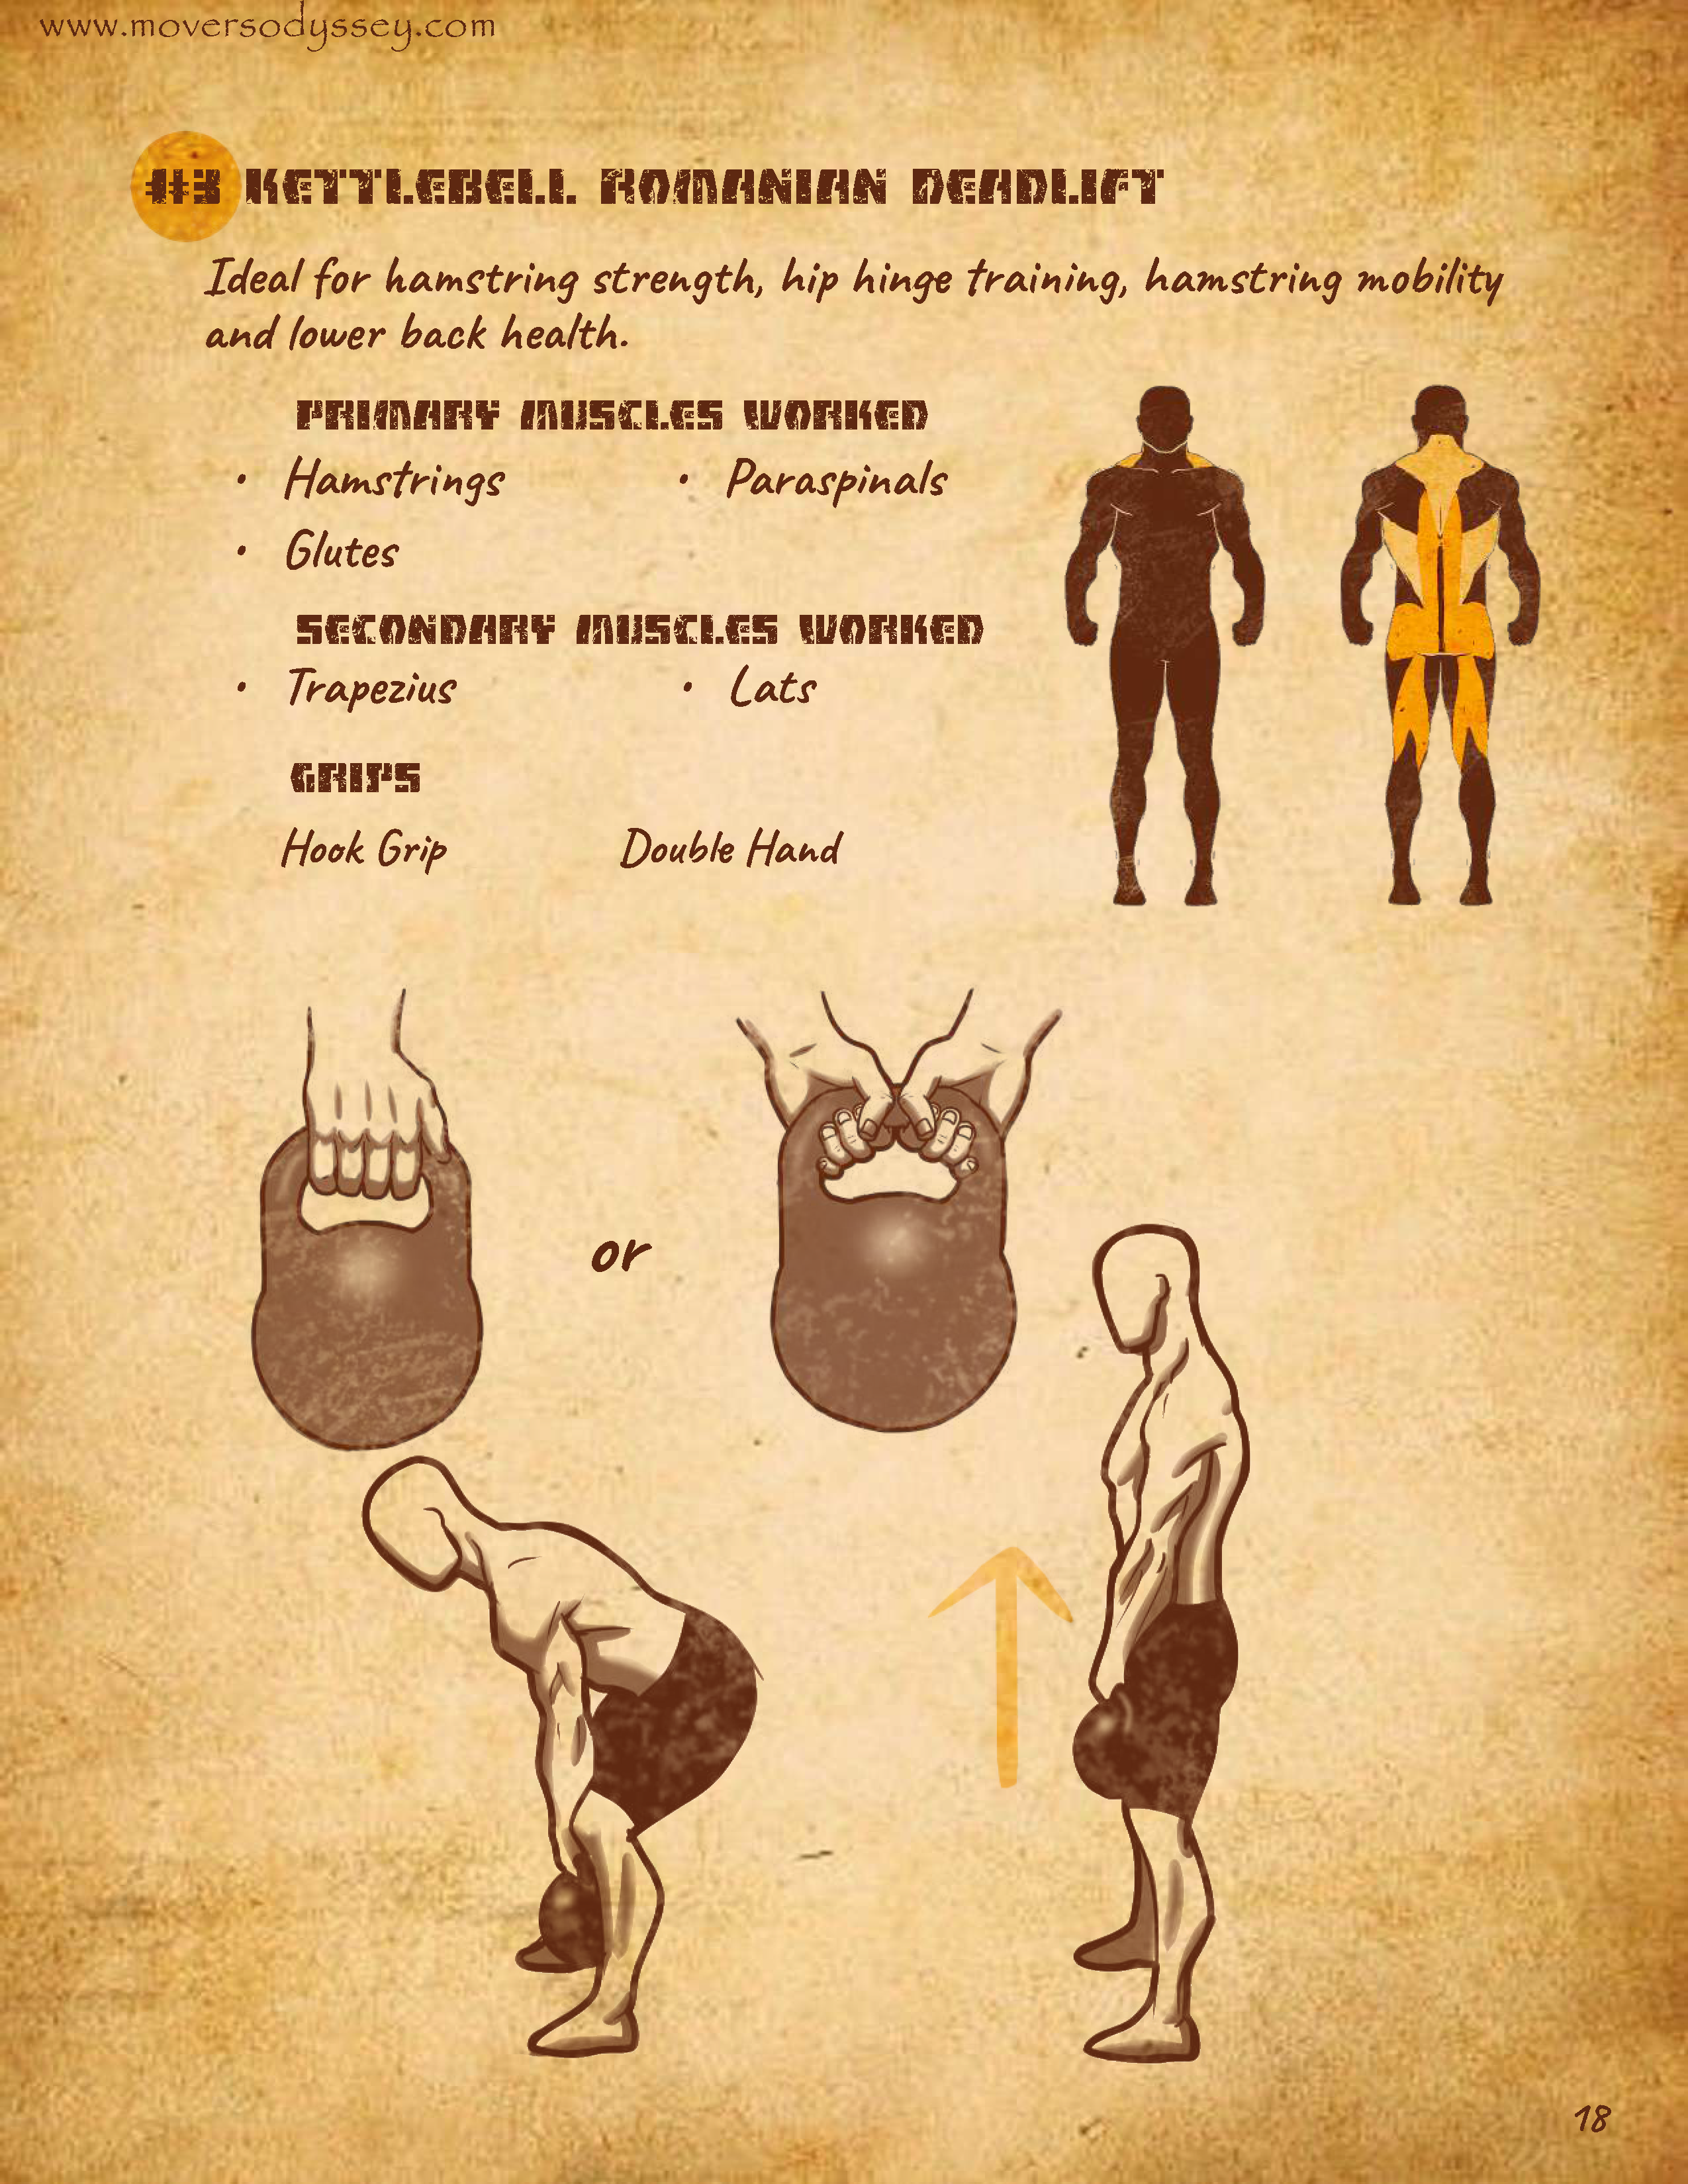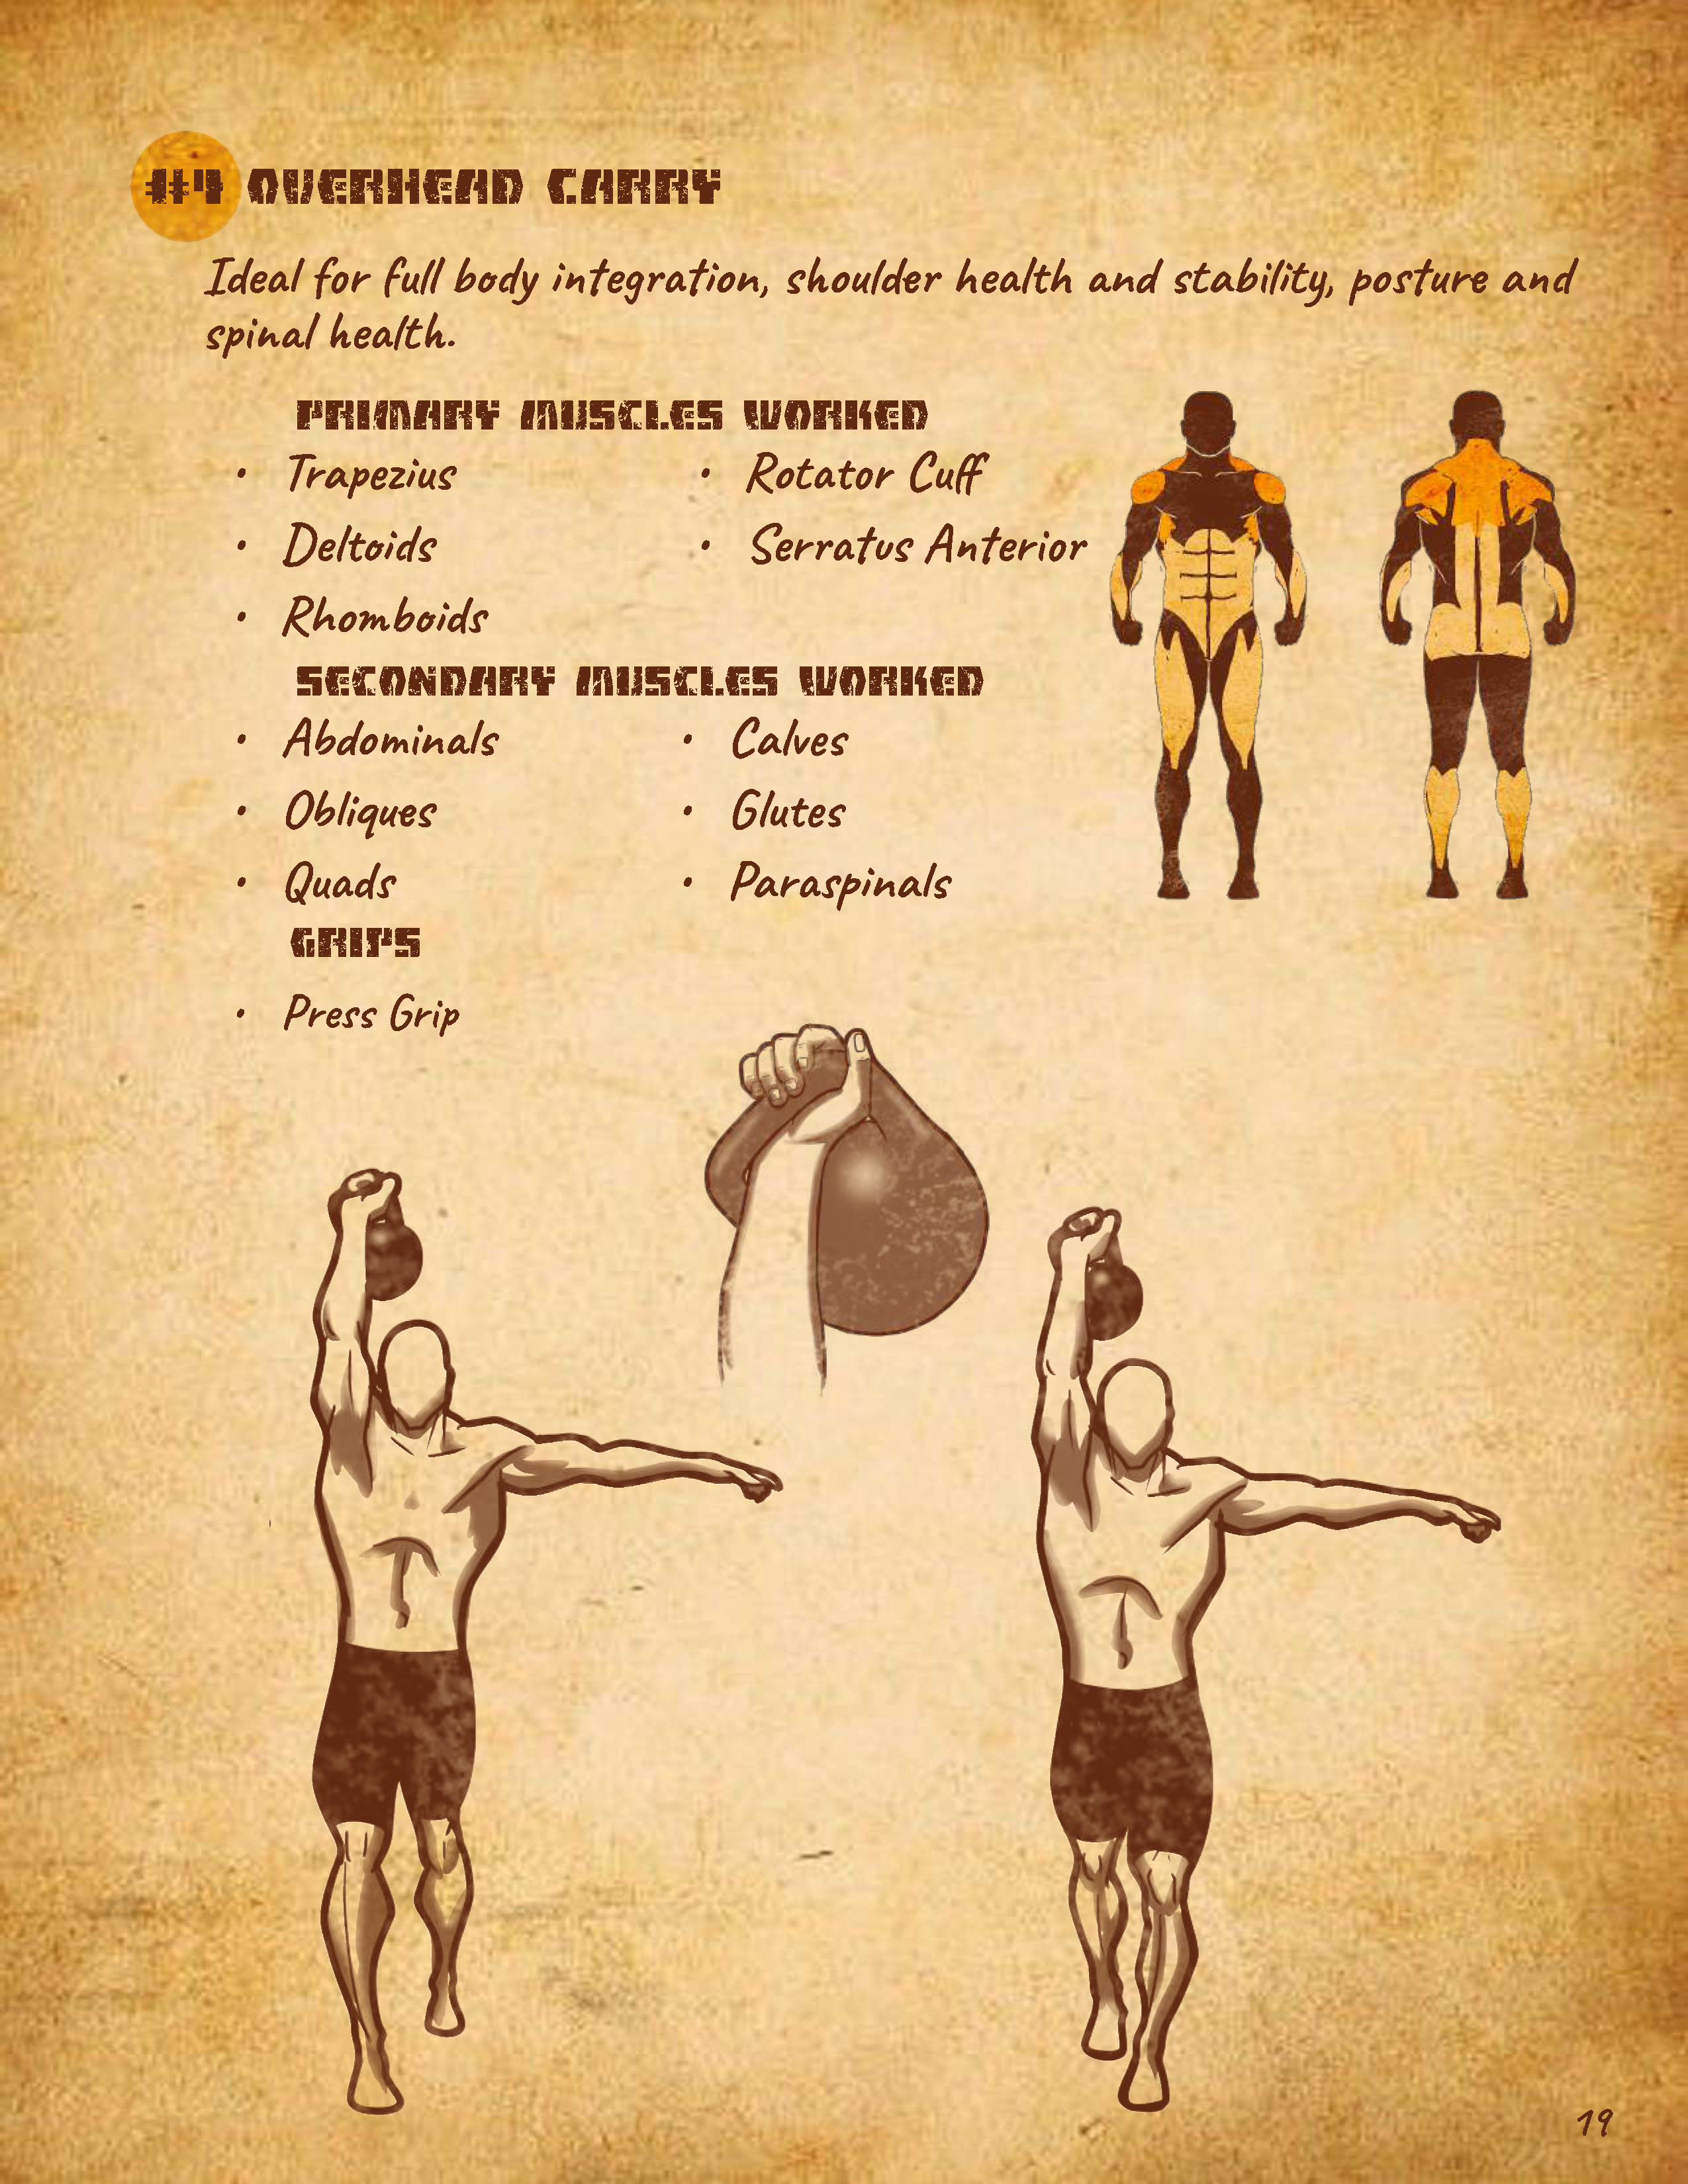
HOW TO PERFORM:
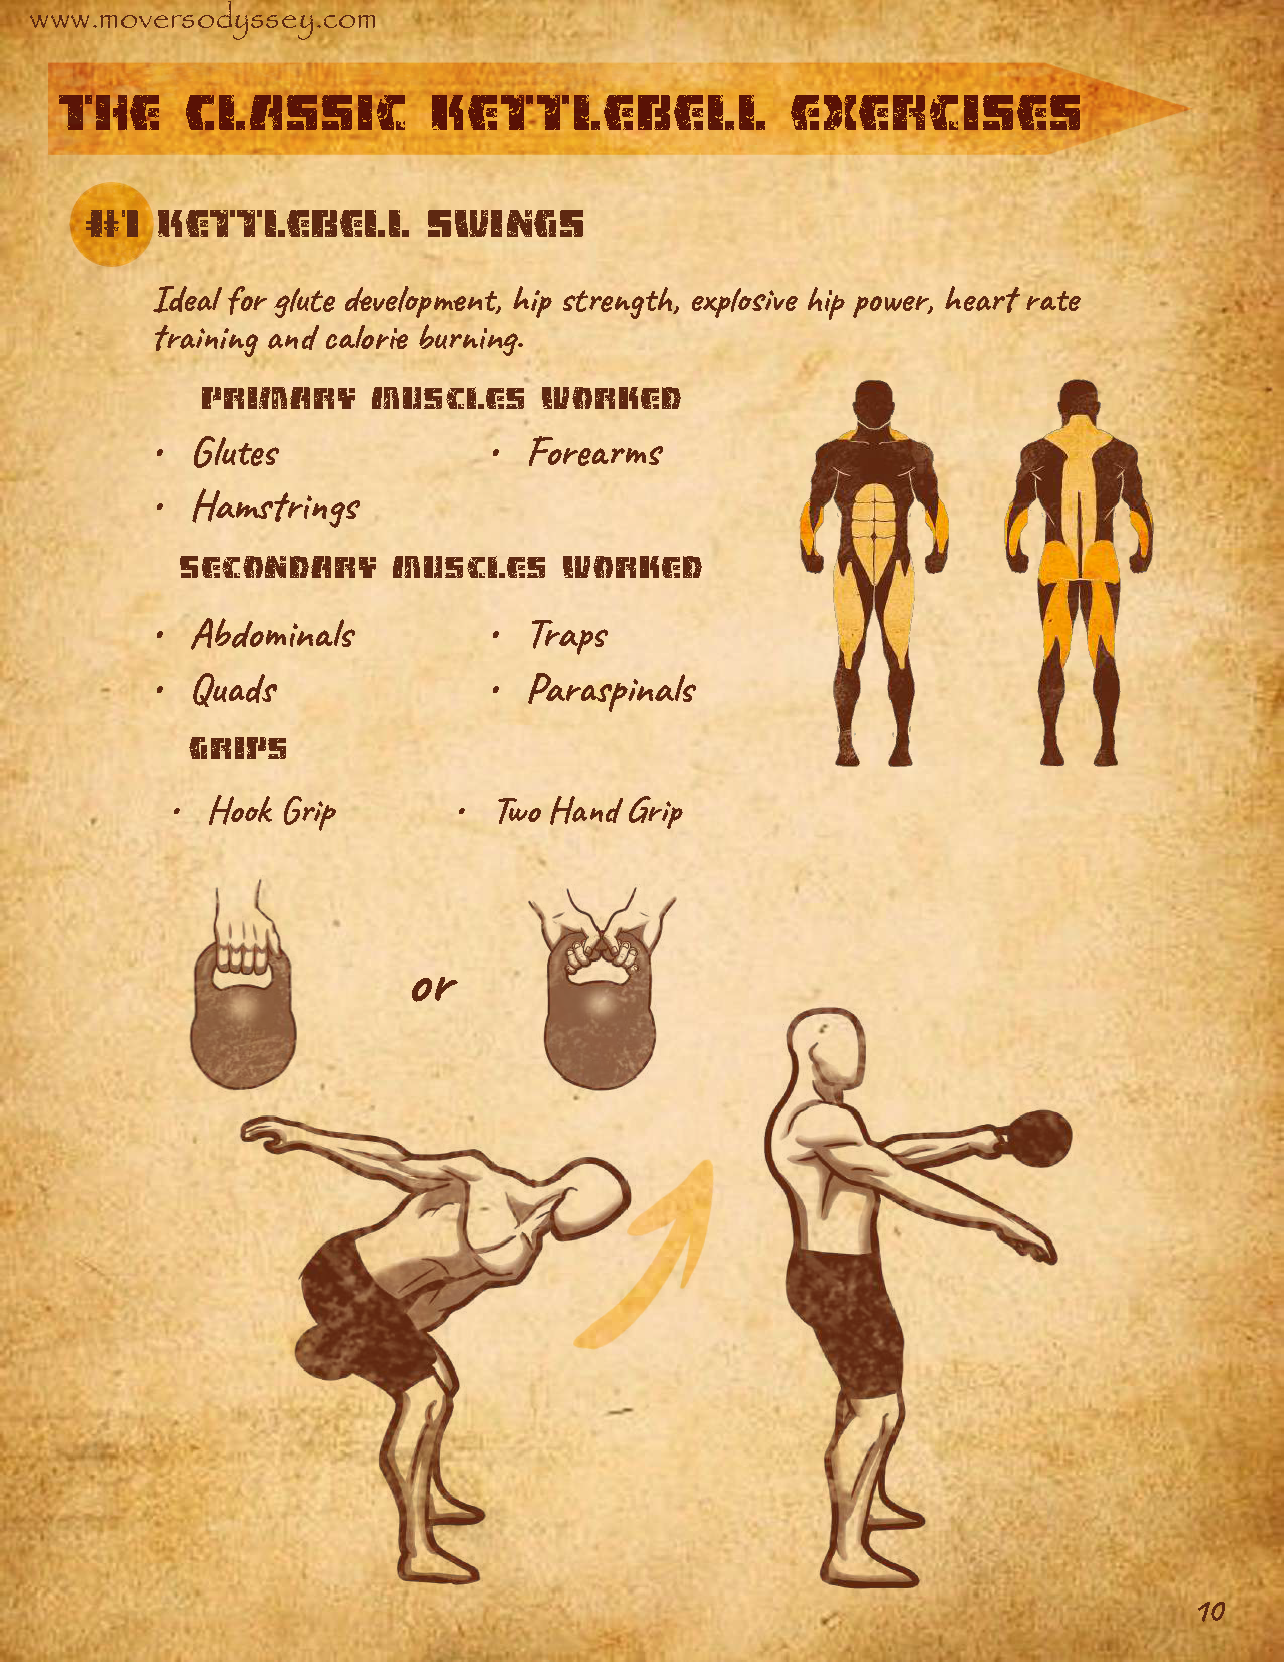
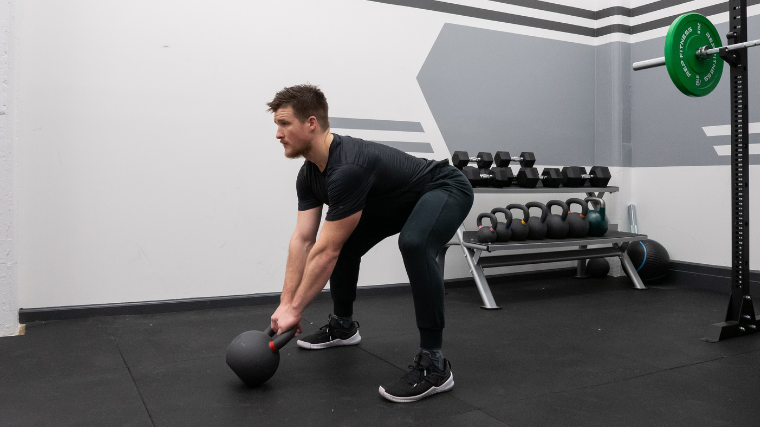
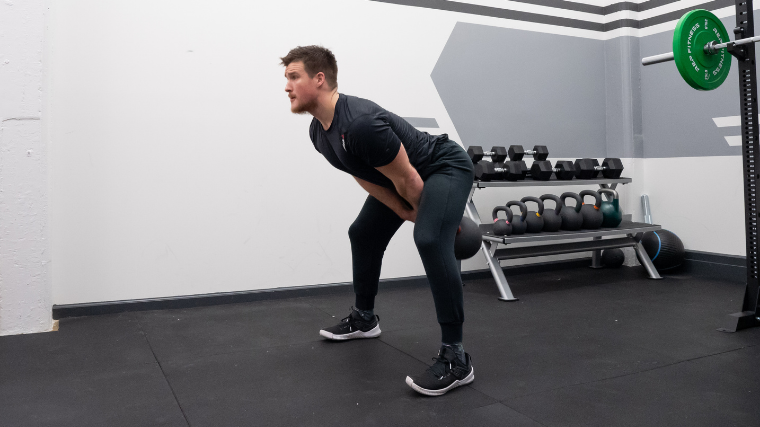
The kettlebell swing is, at its core, an explosive hip hinge. When properly executed, kettlebell swings train your body to generate a lot of lower body power. Start with your feet slightly wider than hip-width apart. Keep your toes forward. Place the kettlebell on the floor 12 to 18 inches in front of you. Hinge down toward the bell. Keep your back flat. Grab the handle of the kettlebell with both hands. Ensure that your feet are flat and you’re balanced slightly towards your heels.
Coach’s Tip: In this position, pull your shoulder blades back and down to engage your lats.
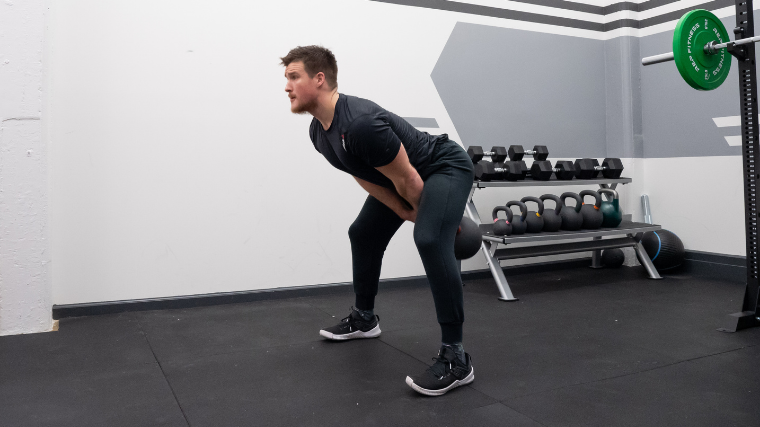
From the set up position, contract your lats and sweep the kettlebell back between your legs. Your knees can bend slightly. Keep the weight in your hips and load your hamstrings.
Coach’s Tip: This is a fluid movement that initiates the “pendulum” motion needed for repeated swings.
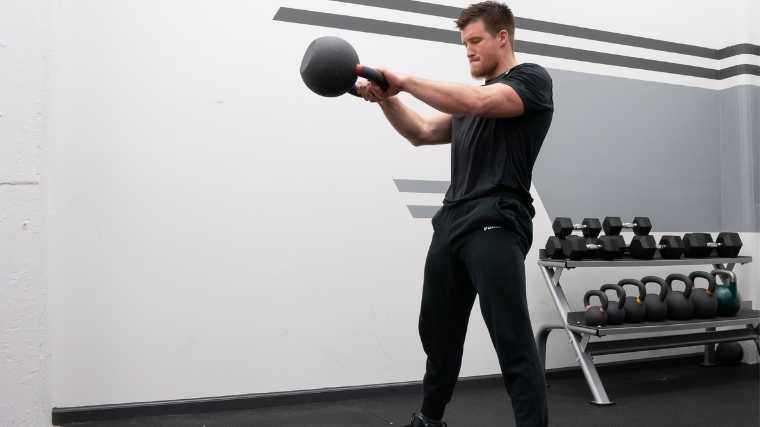
Forcefully drive the kettlebell forwards with your hips and glutes. Simultaneously straighten your knees to bring yourself into a rigid, upright posture. Your shoulders and arms should be loose to allow the weight to swing freely upwards. When the kettlebell reaches its apex, your body should be vertically stacked with your ankles, knees, hips, and shoulders all in alignment. Focus on bracing your core at the top.
Coach’s Tip: Be sure to use your quads, core, and upper back to counter the horizontal force of your hips to remain in balance and resist falling forward.
To reload and perform another rep, allow the kettlebell to fall naturally while sweeping it back between your legs with your lats. Keep your arms loose throughout. There should be just enough space between the kettlebell and your groin that it passes slightly behind your body without colliding with any essential anatomy. Widen your stance if you need more clearance between your thighs. When the kettlebell is at its furthest point, your body should closely resemble the loaded setup position from Steps 1 and 2, priming you to fire off another rep immediately.
Coach’s Tip: Keep your head neutral while reloading your swing — don’t attempt to look forward, as it may strain your neck. Let your eye line fall naturally with your torso.
BEST INSTRUCTIONAL VIDEO:
COMMON MISTAKES:
Squatting instead of hinging
This is easy to spot when there’s just as much knee flexion and extension as there is hip flexion and extension. Instead, the lower leg (tibia and fibula) should be perpendicular to the floor. This means, unlike the squat, there’s little to no motion in the foot and ankle complex (dorsiflexion). During the kettlebell swing, keep the lower body focus in the hip hinge. Tip forward through the hips, then use power in the glutes to drive the hips forward.
Using Strength In The Shoulder Raise
As the hip complex drives forward during the swing, it creates momentum, allowing the upper body to raise in front. Commonly, people will look at the movement in the shoulder complex and assume it’s due to strength. Instead, the arms should be a follow through at the end of the motion. As the hips drive forward, the arms remain rigid, allowing inertia to pull the weight up to shoulder height before swinging like a pendulum back down again.
Low Back Arching
Another common kettlebell mistake is when the lower back either arches during the exercise, or remains in an arched position. This can happen if the core (specifically the transverse abdominis) isn’t activating. By drawing the navel into the spine and bracing, you will be able to keep a neutral spine throughout the movement.
Looking Up At The Beginning Of The Swing
This mistake can cause the lower back to arch. When you begin the kettlebell swing, you should maintain a neutral cervical spine. This means your gaze should go down toward the floor, with your chin pulled in. When you start the swing with your gaze straight ahead, it creates an arch in the cervical spine and likewise prevents you from maintaining a rigid spine through the entire body. Instead, start with the gaze toward the ground, and only let your eyes begin to follow up as your wrists and forearms lift.
Swinging Too High
Even if you use momentum, rather than shoulder strength, to lift the arms, you still might swing too high. The kettlebell should be parallel to the floor at the top of the motion, as should the arms. This is about shoulder height or chest height. For most, when this happens, it’s because the weight is too light. The best technique and the greatest strength gains will come from choosing a heavier kettlebell that’s about 20% of your body weight.
Leaning Back Too Much
In an attempt to further activate the glutes, some will make the mistake during the kettlebell swing to arch their back at the end of the swing. This happens after the hip hinge, where you activate your erector spinae to perform spinal extension. In this error, not only are you placing unnecessary strain and compression on your back, you’re also not gaining the glute activation you think you are. Some will lean back too far because of intentional attempts to create a bigger range of motion. End the motion when the shoulders are at the top of the hips. Others might have tight hip flexors. In this instance, the glutes cannot fully contract at the top of the hip hinge, so the body leans back and arches the back. You can help remedy this with proper movement preparation before the workout, including hip flexor stretches and glute activation exercises such as a glute bridge.
WATCH THE VIDEOS BELOW TO LEARN EVERYTHING ABOUT THE KB SWING:
ALTERNATIVES AND VARIATIONS:
ONE ARM KB SWING
CROSS-BODY KB SWING
ALTERNATING KB SWING
CHEST LOADED KB SWING
Performing the KB Swing with one arm can benefit core strength, balance, stability. However, it's too easy to lose concentration and stop performing the exercise correctly after many reps (and the idea of The Swing is to do many reps), you will start compensating with one side more than the other, you will lose form and instead of balance, you will achieve the opposite. You also might injure yourself. Unless you are perfectly focused and manage to not lose form every and each rep of this exercise, better stick to the two-arms KB Swing.
This exercise is good for building rotational strength - strengthening stabilizing muscles, lateral muscles and core. Grab your kettlebell by the handle, feet shoulder width apart, kettlebell hanging in the middle. Keep knees soft. Twist your body to one side and engaing the shoulders and lats, swing the keetlebell from one side to the other. As the body is crossing over, rotate at the hips and change feet position as shown in the gif. Keep knees in line with the toes so the whole leg twists. Rotation at the hips allows for keeping the lumbar spine and lower back to stay in place as they should not be rotating. Since this exercise is relatively easy to cause an injury, start with low weight or no weight at all until you master the movement.
This exercise enhances grip strength, coordination, and explosiveness. To perform the alternating kettlebell swing safely, it's crucial to maintain proper form. Start with a lighter kettlebell to learn the technique and gradually increase the weight as you become more proficient. Ensure that your feet remain firmly planted on the ground, and your knees track in line with your toes to protect your knee joints. Keep your back straight, hinge at the hips, and avoid rounding your lower back to prevent injury. Engage your core muscles to stabilize your spine and maintain control throughout the entire movement. Remember to maintain a smooth, controlled rhythm to avoid overexertion or jerky movements that could lead to strain or injury. Similarly to the one arm KB Swing, until you've mastered the two arms KB Swing, better not jump straight to this exercise.
Stand with feet between hip and shoulder-width apart and hold the kettlebell by its horns, pulling the bottom of the bell into your lower sternum. Draw your shoulder blades together and down (“proud chest”) and cast your eyes on a spot on the floor approximately 15 feet in front of you. Take a deep breath and root your feet. Then bend your hips back, imagining being able to touch your butt to the wall behind you. Keep a long spine with your tailbone tilted slightly up. When you feel a stretch in your hamstrings, extend your hips and squeeze your glutes, tucking your tailbone under as you lock out. This is a killer exercise for the hamstrings and can replace all kinds of deadlifts and other posterior leg exercises. Just be careful to perform correctly so you don't injure your lower back.
KEYPOINTS
Finding optimal stance
Feet width - just set your heels a little wider than hip's width. You need just enough space for your hips and torso to fall between the knees. To figure out the feet degree angle stand with socks on a hardwood floor, so your feet can freely slide on the floor. With feet hip-width apart and pointed straight ahead, squeeze the glutes as hard as you can, rock back slightly on the heels and allow your feet to turn out. You may find that one foot turns out more or less than the other, this is completely normal. Wherever your feet settle, is probably gonna be the best angle for your squats.
Supercharging every rep
Use your abs and hip flexors to actively control the descent. You can achieve this technique by lying on your back and using a long resistance band around your feet. Pull your knees into your chest. This mimics the squat pattern and helps you achieve full range of motion by actively utilisng your core and hip flexors. Hold the deepest position for about 5 seconds while maintaining core tightness and a neutral spine. By learning how to actively pull yourself into hip flexion, your squats are going to be stronger and safer.
Execution
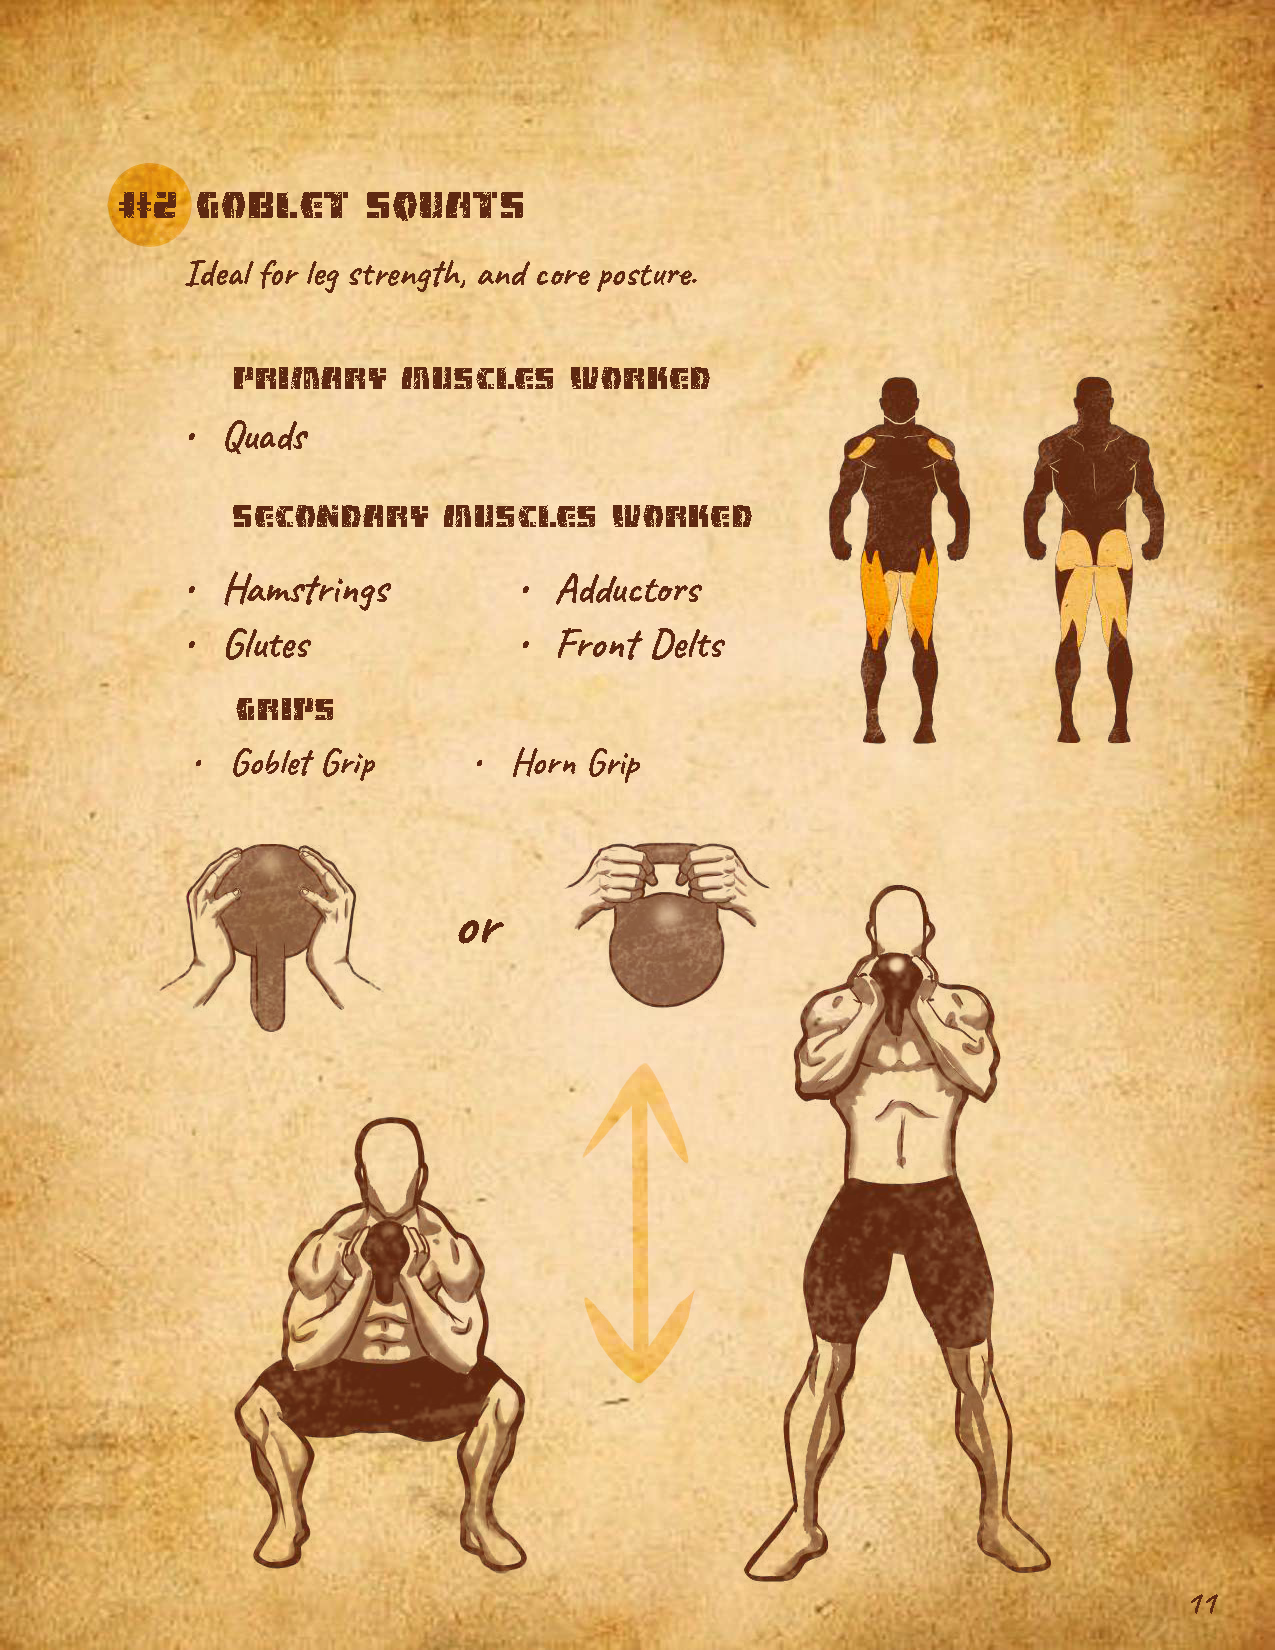
Get the kettlebell into position by quickly deadlifting it off the floor. As the hips lock out, bend the elbows to guide the kettlebell up to chest-height. Quickly shift your grip from the top of the handle around to the horns. Settle the bell with a tight grip, elbows point down and hold a few inches away from the chest. Simultaneously bend at the hips and the knees, keep the chest up and remember to actively pull yourself down into your deepest comfortable range of motion. Allow the elbows to slide just inside the knees. This should ensure that your knees are tracking approximately with your middle toes. Keep the spine long and straight at the bottom and double-check your mid-foot balance. The big toe, pinky toe and heel should all feel equally loaded. Start the ascent with a grunt to pressurise the core and exhale through to the lockout.
Avoid:
Not flexing enough at the knees. Your knees moving in front of your feet is not a sign of bad form.
Rounding the lower back. This is caused by not staying tight enough on the descent or squatting too deep. Remember to actively pull yourself down and there is nothing wrong in squatting just below parallel even if you have the flexibility to go lower.
Rounding the upper back. Keep the shoulders pulled down and back for a proud chest. You can even think about pulling the kettlebell handle apart to maintain this tension. You might be also using a weight a bit too heavy.
Allowing the hips to shoot out and tip the torso forwards on your way up. Really think about leading with the upper back and shoulders on the ascent. Again, this could also be due to using a weight that is too heavy.
Allowing the heels to rise. Be a real Slav, squat with full foot on the ground. Could be due to tight ankles.
Letting the elbows to flare out.
ALTERNATIVES AND VARIATIONS:
SINGLE RACKED SQUAT
DOUBLE RACKED SQUAT
BOTTOMS UP SQUAT
KEYPOINTS
Learn The Clean
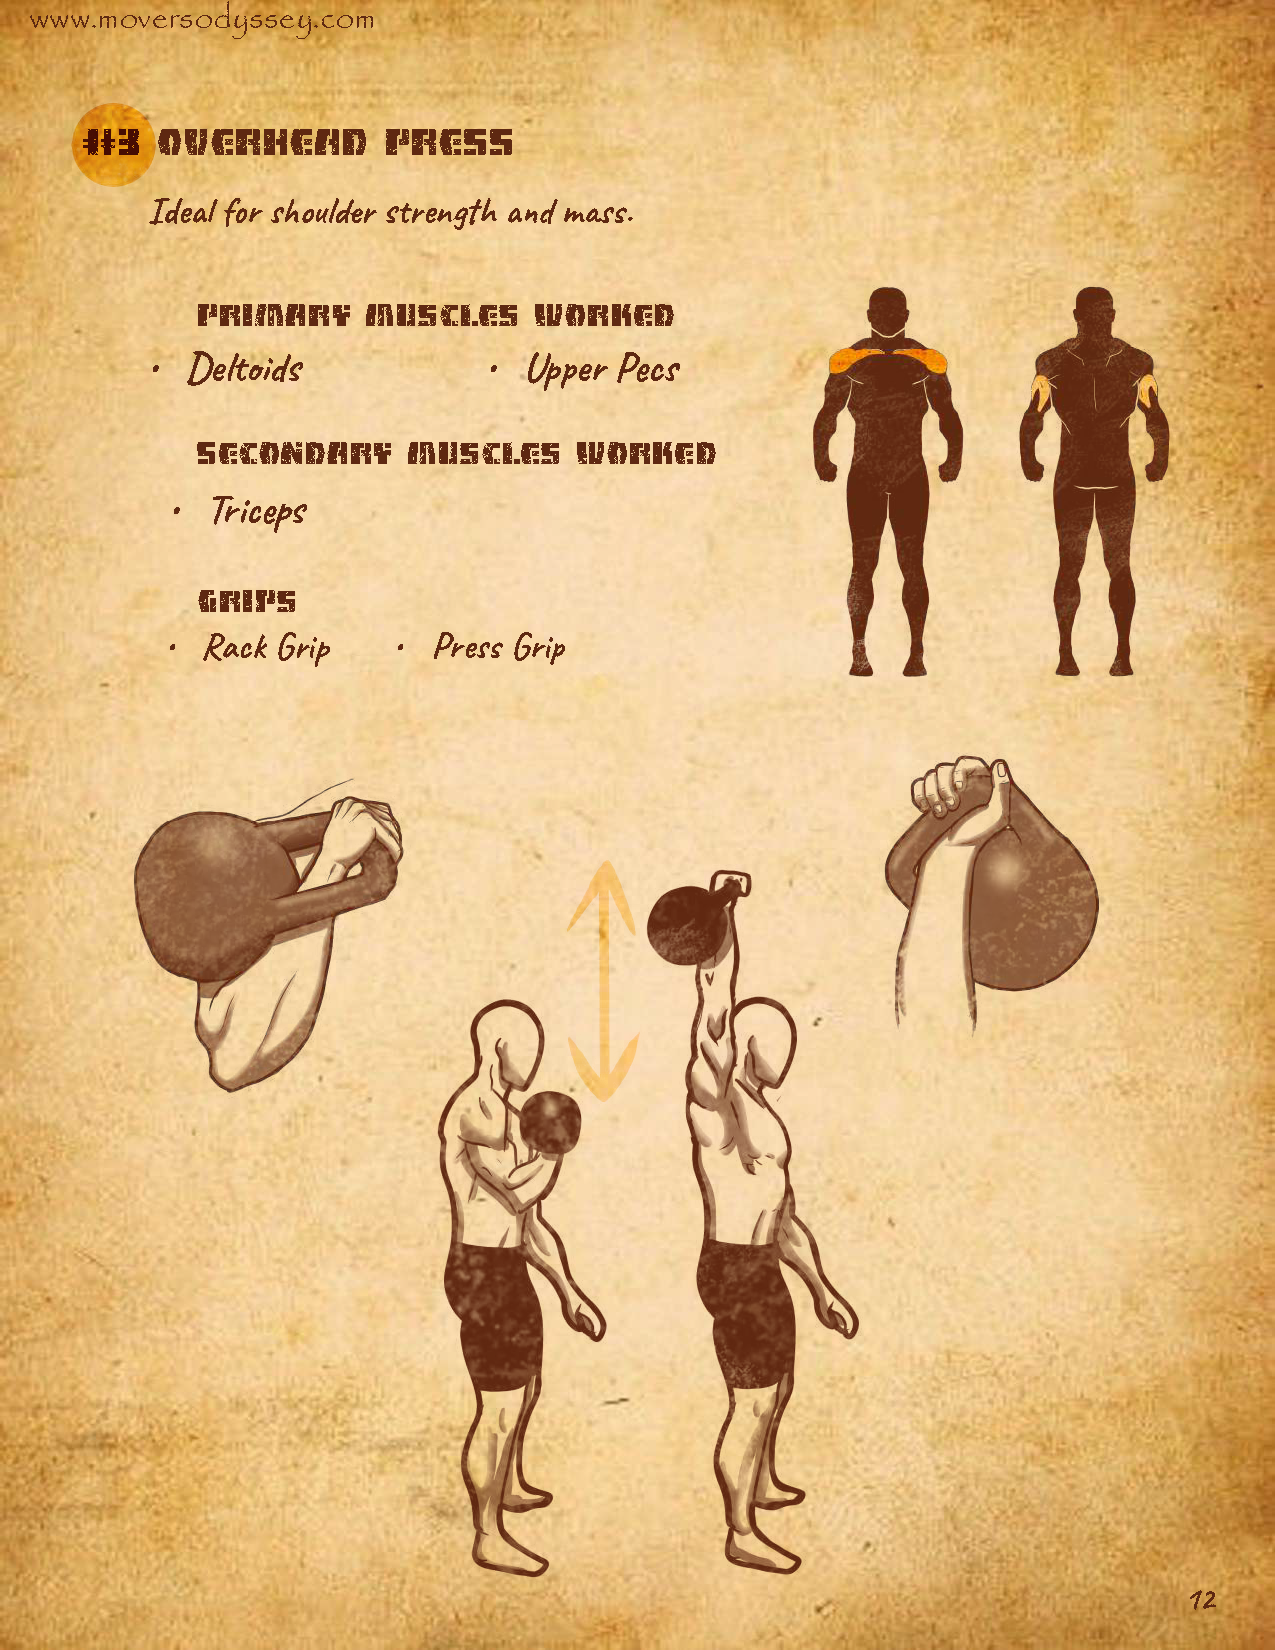
The Overhead Press starts with the Clean, so before learning how to overhead press, better learn how to Clean first.
The Zip-Up technique
The Zip-Up Technique engages every major muscle group in your body starting from your feet all the way up to your shoulders. Doing so in a sequential order will provide the most stable base and platform from which you will press from. This approach is very important for safety and maximizing strength. After cleaning the kettlebell, grip the ground with your toes while keeping a tripod floor balance. Flex the quads. Think about pulling your kneecaps up towards the hips. Squeeze the glutes as if pinching a penny with your cheeks. Brace the abs as if preparing for a punch in the gut. Tighten the pecs and lats to squeeze the armpit. Bear in mind you don't have to engage with a 100% intensity all the time. Enough is enough. Scale your effort with the amount of weight that you are using. In time after practice, you will be able to run through this internal sequence in less than a second.
The Press itself
Keep your wrist straight. Don't let it twist outwards. Load the actual weight beneath the pinky, not the thumb. The main pressure point should be on that lower quadrant of your palm under the pinky. Think about pressing through your Ulna bone when pressing up. Don't press too fast right off the shoulder. Think about pressing through first gear and then exelerating as you progress through the movement. Your pressing arm will naturally arc out to the side as you pass head height. The forearm should remain vertical to the ground, but don't try to press in a perfectly vertical line. As you aproach lockout, the arm will drift back towards the head. Press against the kettlebell with smooth and even force while maintaining the total body tightness you achieved in the Zip-Up Technique.
The overhead lockout
Keep driving the knuckles skyward until the elbow locks out straight. The arm should settle with the bicep lining up right next to the ear. Pause for a few seconds to ensure the arm is stacked and balanced over the shoulder. Actively keep the triceps engaged to keep that arm straight.
The Negative
How you bring the kettlebell back down is just as important as how you put it up. What you wanna think about is not simply allowing gravity to have the weight fall back but rather squeeze tight and PULL the kettlebell back down to that racked position. You will be co-contracting all the musculature around your arm, pecs, lats and shoulder. This technique essentially winds you up and allows you to launch right back into the next rep.
Stance
Total body engagement begins at the feet. Of course, you need to first clean the kettlebell before you press, but cleaning it requires a wider foot stance than what is good for pressing it afterwards. So after doing the clean, quickly bring the feet in.The feet distance should basically be about hip-width wide, but some techniques promote joining the feet at the heels in the basic military attention stance.
Breathing
The breath has a huge impact on strength performance. The breathing guidelines here will differ depending on how much weight you are lifting. Breathe-in through the nose during the Zip-Up Technique, hold the breath as you initiate the press, the exhalation comes with the exertion and that's gonna depend on the weight you are using. For easy reps - smooth nasal exhalation through the press. For more challenging reps - exhaling through the mouth as if you are blowing out birthday cake candles. For heavy weights or finishing that last terrible rep - power exhalation with a hissing sound to pressurise and brace the abs, to help you grind out that heavy rep and to scare your enemies in the viscinity. Pause for couple of seconds when you reach the top of the press and take another breath in. Ensure you have a belly full of air through the negative just to help keep the abs braced and shoulders stable.
ALTERNATIVES AND VARIATIONS:
DOUBLE OVERHEAD PRESS
SEESAW PRESS
BOTTOMS UP PRESS
SUITCASE PRESS
LIBERTY PRESS
HALF KNEELING PRESS
Z PRESS
LEARNING THE CLEAN
HOW TO PERFORM:
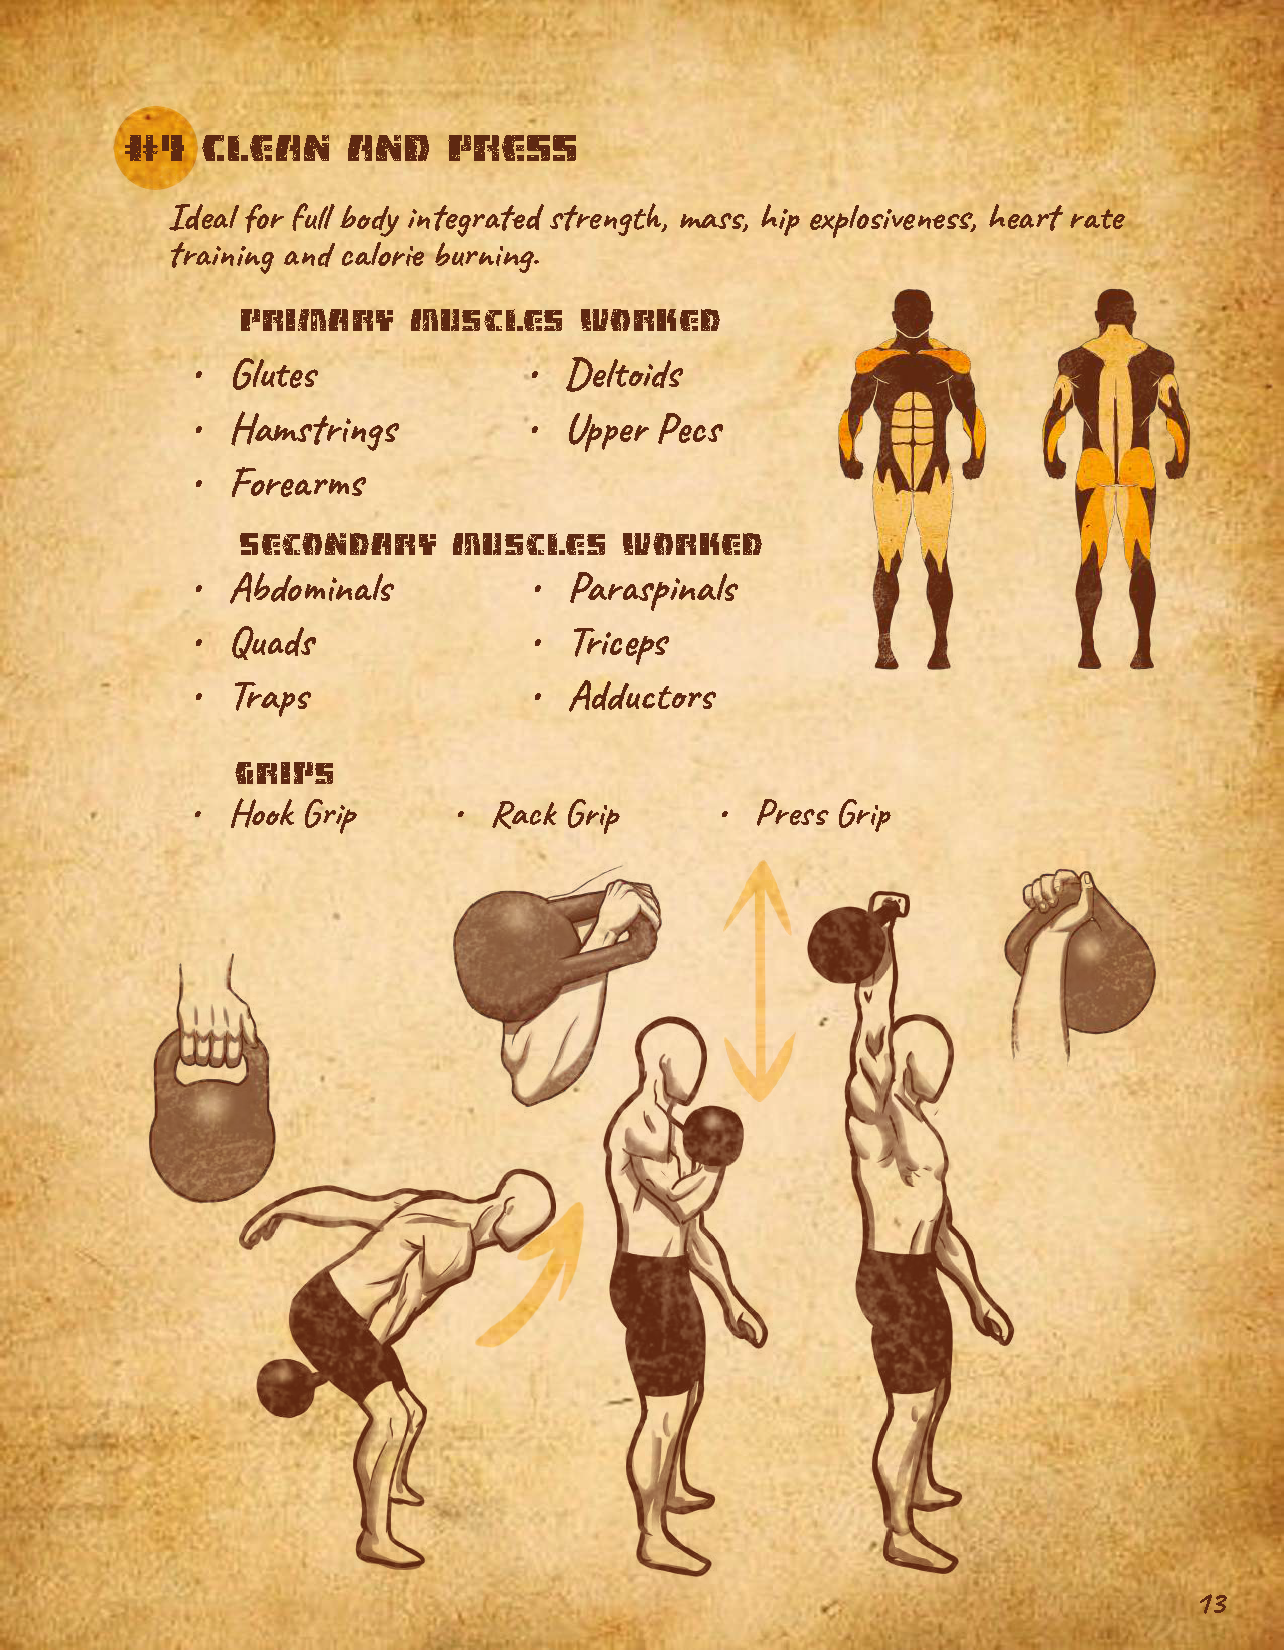
1. Set up as if you were to perform a single-arm swing: with your feet about hip-width apart and the kettlebell placed about a foot away from the tip of your big toe. Throughout the movement, your weight should remain on your heels – not move onto your toes.
2. Reach down for the kettlebell by hinging at the hips and maintaining hamstring tension and squeeze its handle. Activate your shoulder blades by pulling your shoulders down and back.
3. Swing the bell back between your legs, maintaining a neutral spine (not rounding your lower back).
4. Now forcefully push your hips forward and extend your knees – to propel the bell up. To do that, squeeze your glutes and abs – to get a solid platform throughout your core. Slightly retract your shoulder – so that the bell gets into a more vertical trajectory, moving close to the body rather than away from it. Keep your upper arm close to your torso as if the elbow was glued to your side.
5. As the kettlebell reaches your chest level, it should softly roll around your wrist and softly (softly!) land on your forearms. In the racked position, the body of the kettlebell is resting on your forearm, and your elbow stays connected to your torso. Your hips and knees should be locked out, and your core should remain tight.
6. Now, send the kettlebell down between your legs. As you do it, make sure that your arm goes completely straight: if you try to keep it bent on the backswing, you may put unnecessary strain on your muscles. Throughout the movement, keep the upper arm connected to the torso: in the backswing, the kettlebell should also move close to your body.
KEYPOINTS:
The Grip: Do not use overhand grip, as this will make The Clean become a curl instead. Position your palm and kettlebell handle sideways - your thumb should face up. This way the kettlebell will rotate around your forearm and smoothly glide to the racked position without slamming your wrist and forearm. Another keypoint is how much you squeeze the grip of the kettlebell - maintain a loose grip in order to allow the KB to rotate freely. If you keep a deathlock grip throughout the movement, the kettlebell won't be able to rotate into the desired position. Hold the handle at the corner, not in the middle. Keep the wrist in neutral position, don't allow it to bend outwards.
The Downward Movement: Peel the kettlebell away from the body by rotating your palm to face towards you when you start going down. This will guide the KB on the correct path to down between your legs and allow your hand to slide at the back of the handle and catch it in the root of your fingers. In other words, you can skip your palm on your way up AND your way down which allows this exercise to feel super fluid and much more enjoyable.
Elbow Position: Don't make The Clean become a Swing - keep your upper arm tight to your body. Elbow should not flare out.
HOW TO PERFORM:
1. Stand with your feet shoulder-width, toes pointing forward rather than at an angle. Hold one hand (not the one you will be using to grab the bell) up to the side – for counterbalance.
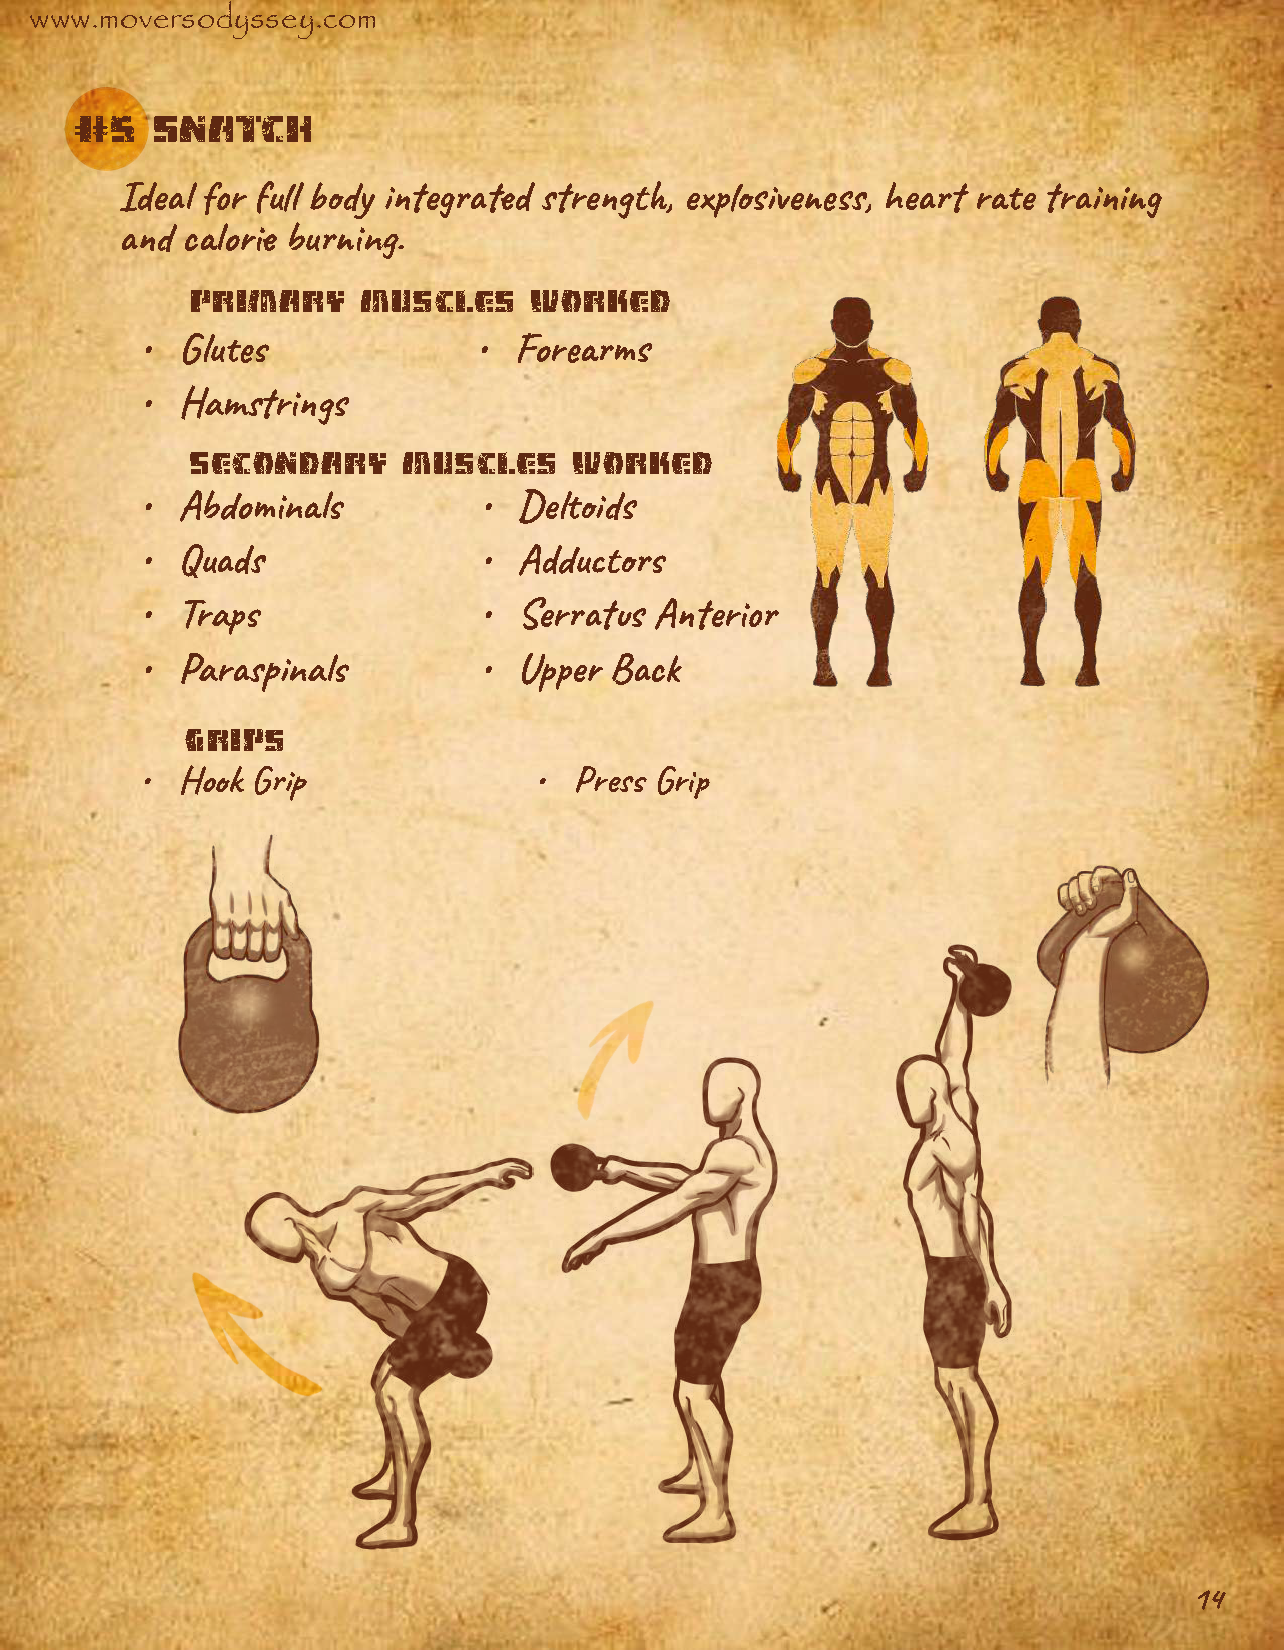
2. Grab the handle of the bell by the inside corner. Here, your arm should be snug next to your body. You want to maintain this contact as long as possible, before pulling the bell up.
3. Start swinging the bell as you would for a kettlebell swing, but keep the bell close to your body.
4. As the kettlebell passes your knees, start pulling it up and back, so that it transitions from an arch to a more vertical path. Imagine that you are standing in front of a wall which you may not hit with the bell as you pull it up.
5. When the bell reaches your chest level, pull it towards you and push the hand up. Important: as the bell moves upward, rotate your hand around it rather than flipping it over your hand (to avoid beating yourself up on the forearm. Those bruises hurt a great deal!).
6. At the top of the snatch, your fingers should be pointing upward rather than wrapped around the handle of the bell. Your wrist should be as flat as possible, as opposed to the "barbell grip" – it will prevent your elbow from bending. The body of the bell should be resting on the back of your arm. Your core must stay engaged, the elbow of the hand holding the barbell must be locked, and the shoulder must be packed tight into your back – no floppy postures.
7. From the bell-up position, turn your pinkie towards the front and let your hand come down. The kettlebell should roll nicely around your hand rather than flopping down your forearm. On the descent, keep the kettlebell close to your body.
COMMON MISTAKES:
Too Soon: Before you start learning the kettlebell snatch, you must have mastered at least the Kettlebell Swing, Clean and Press. Besides, you need good shoulder stability and mobility. Don't hurry: work on those first.
Floppy shoulder: At the top position, your shoulder should remain tight in its socket. It will prevent the momentum of the kettlebell from pulling the shoulder out of its safe position.
Around – not over: As you snatch the bell up and drop it down, it has to go nicely around your wrist – not drastically fall over and hit it with all its metal madness. Try moving your hand around the bell rather than moving the bell around your hand.
Achy neck: At the top position, don't push your chin forward. Keep it tucked back, otherwise you might injure your cervical spine. Do not hurt your neck – it is pretty useful in everyday life.
Straight arm: Do not keep your arm straight throughout the movement. At the pull portion of the snatch, bend it – you will straighten it again later, at the top. Keeping the arm straight all the way up will result in hitting your forearm with the bell.
Forward pull: If you feel that the barbell is pulling you forward, and your centre of gravity is moving towards your toes, you are not doing it right. Keep your weight off your toes, move the load towards the powerful muscles at the back of your body.
Not breathing: "I breathe", you will say. Sure, you do, otherwise you wouldn't be reading this right now. But what we mean is: you need to maintain proper, rhythmic breathing throughout the entire set. Start the lift with an inhale. Exhale during the snatch up. Take a quick inhale with the bell at the top. Repeat.
PROGRESSION VARIATIONS:
HALF SNATCH
REVERSE HALF SNATCH
Benefits of the Turkish Getup
The Turkish getup requires you to do several common but necessary everyday activities: lying down, lifting yourself up, standing, then getting yourself back down. The move is methodical, especially when you begin adding weight.
Mastering the Turkish getup will help you:
- Increase shoulder stability
- Enhance total-body strength, especially as you work through multiple planes of movement
- Develop plenty of core and rotational strength.
Who Should Do the Turkish Getup
For a variety of different reasons, the Turkish getup is a great tool for just about everyone. It can be great for athletes and experienced trainees to help develop greater shoulder stability and rotational strength. It’s also beneficial for less experienced gym-goers or older folks who aren’t necessarily looking to build muscle. In these instances, the Turkish getup should be classified as more of a testing mechanism as it can be indicator of injuries, mobility issues, and other physical weaknesses. Importantly, this exercise isn't necessarily the best choice to build muscle and strength—so it's not the type of move you'll use for progressive overload in every workout.
Muscles Involved in the Turkish Getup
The Turkish getup is a full-body movement. Nearly every muscle involved in this lying-to-standing movement—from legs to core to chest to shoulders to arms—is required for completing just one rep. You’re even getting some grip work as well, since holding a weight over your head will test your wrists and fingers. Again, although it hits every muscle, the Turkish getup shouldn’t necessarily be thought of as a muscle or strength building exercises for any specific body part. What you’ll gain however, is a greater test of muscle stabilization, a fitness element necessary for any training goal you may have.
What Equipment You Need to Do the Turkish Getup
The Turkish getup is versatile enough in which you can gain benefits from using just your bodyweight (although the main goal is to work your way up to holding an implement equal to half your bodyweight). You can also use dumbbells and barbells—even try using a full and uncapped water bottle if you want to get creative. However, the kettlebell is probably the most common and most effective tool for doing Turkish getups due to its design which helps keep your shoulder in a nice and stable position throughout the movement. Kettlebells offer a variety of options, including the bottoms up Turkish getup, which will really challenges your stability.
How to Include the Turkish Getup in Your Workouts
For many people, using the Turkish getup can be best utilized once or twice each month as an assessment tool. In this case, you’re not using the move to get stronger, but instead to ascertain weakness in your movement patterns. You can also break down the Turkish getup into separate elements if you find yourself struggling at certain points. For example, if you see a hitch in your form while maintaining the stack position or as you bridge or even thread your leg to a lunge position, you can work just those specific sections a few times in order strengthen that area of weakness. Three sets of about eight to 10 reps of the problem spot should be enough to break the struggle. This will help build a stronger mind muscle connection, then come back in about a month and test yourself again. You can do the Turkish getup more often, but keep it in mind that you won't be building muscle or (as much) strength.
The Best Sets and Reps for the Turkish Getup
If you’re one of those people who prefer to incorporate Turkish getups more often, you can add it into your warmup. Start with three to five reps on each side for three sets, using moderate weight and progress your way up. This should be enough to fire up your CNS. Still not enough? Then throw the movement into one of your workouts by choosing a challenging weight and work for about three sets of about three to five reps.
STEP BY STEP:
Before picking up a kettlebell, you should work on mastering the Turkish get-up with just your body weight.
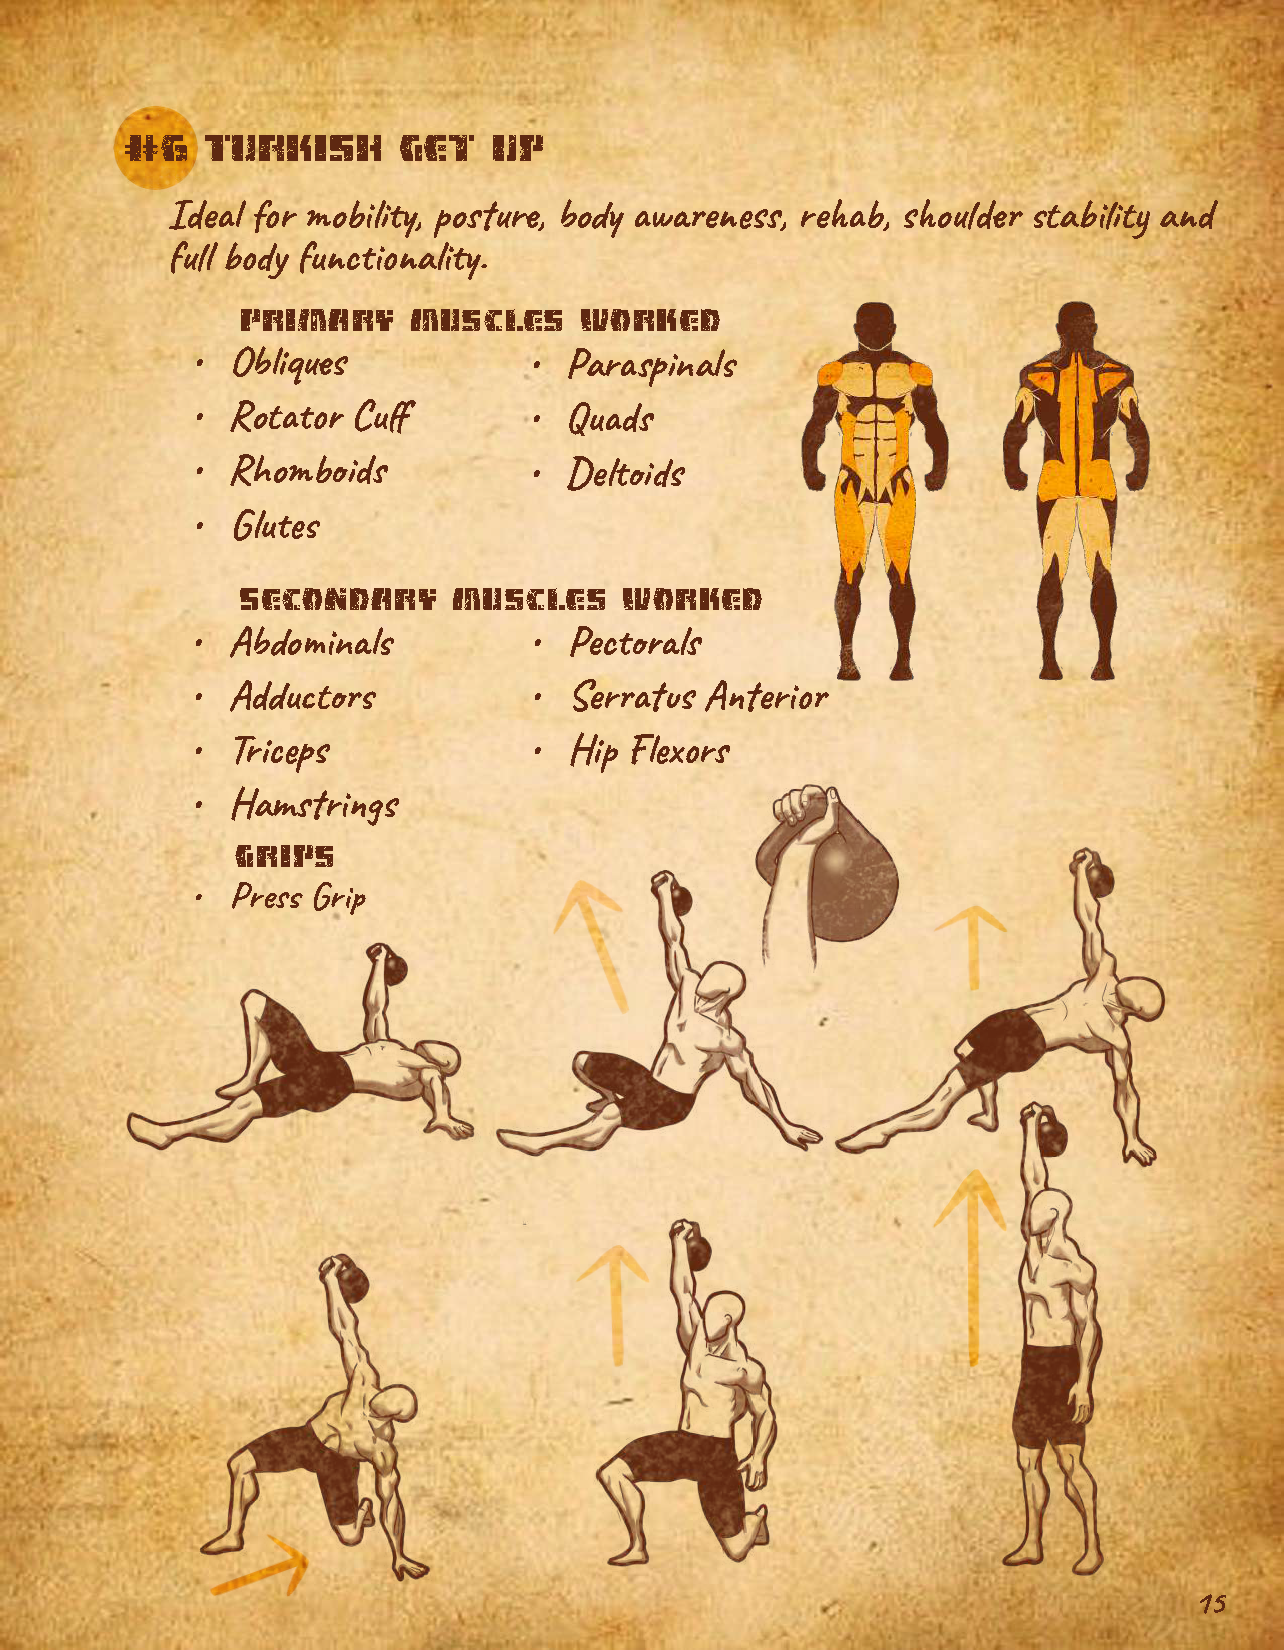
Lie on your back in a starfish position with your legs straight out at a 45-degree angle and arms out at a 45-degree angle. Bend your right leg and place your right foot flat on the floor a few inches from your butt and outside your hip. Bring your right arm straight up toward the ceiling, making a fist with your right hand and keeping your knuckles pointing straight toward the ceiling. Don’t let your wrist bend backward. Set your gaze on your fist, which is where the kettlebell will eventually be.
Next, push through your right heel and your left elbow to prop yourself up onto your left elbow. In this position, your left shoulder should be packed. To pack your shoulder, start by slouching your shoulder rounding it forward, and then reverse the motion by pushing your arm through the floor so that your shoulder is packed down and away from your ears. Your chest should be facing the wall in front of you, not facing the ceiling.
From here, place your left palm on the floor, pushing into the floor and using your abs to pull your body into a seated position. Keep that left shoulder packed the entire time. Think about screwing your palm into the floor so your elbow pit turns out away from you, and your fingertips are turned slightly back behind you.
Next slide your left leg underneath you and toward your butt, placing your left knee and left ankle in a straight line with your left hand. Your left knee should be stacked directly underneath your left hip and the distance between your knee and your hand should be about the same length as your torso. If you need to adjust, adjust your knee and not your hand.
From here, shift your weight back toward your left heel. Come to an open half-kneeling position (in this position, your “up” knee should be at a 90-degree angle and pointing directly in front of you and your "down" knee should also be at a 90-degree angle but this knee is pointing to your left). Now, shift your legs into a half-kneeling (or a lunge) position by sweeping your left leg (down knee) behind you to the left, so that this knee is now pointing directly in front of you. You should now be looking straight ahead.
From here, think of getting nice and strong, engaging your core, and pushing your back foot into the floor to bring your feet together to a standing position. Congrats! You’re halfway there.
To get back down, you are now going to perform all the steps in reverse. Going down is just as important as going up, so be sure not to rush this part or let yourself relax. You should still be holding the kettlebell with a straight arm over your head. Start by taking a big step back with your left leg into a reverse lunge. Then, reverse the sweeping motion of the left leg (down knee) to return to the open half-kneeling position.
Once in the open half-kneeling position, sit your hips back toward your heel while reaching your left hand down and placing it on the floor in front of your left knee. The distance between your hand and your knee again should be about the length of your torso. At this point, switch your gaze back up to the fist or kettlebell until you finish the movement.
Shift your weight back into your left hand. Sweep your left leg out from under you and sit down with your leg extended. You should end up in the same position here as when you were rolling up onto your hand. Your palm should be screwed into the floor, elbow pit rotated away from you, and shoulder packed and away from your ears.
From here, push your palm into the floor and let your elbow bend in toward you. Make sure as you touch down to your elbow you keep that shoulder packed. Slowly push your left arm into the floor and allow yourself to gently come back to the floor.